Blinging up your website built with hugo via blogdown R package

Having a presence on the internet is becoming increasingly important for gaining exposure. In particular, having a personal website that shows your skill can help build your reputation and form your personal brand.
The purpose of this blog post is to show the use of simple but cool html tricks to embed within your website and building your own showcase website.
You will need to have R and Rstudio installed. You should be familiar with some basic programming. It will be helpful to know html, css, and javascript but I didn’t know much when I started so it shouldn’t be a barrier to learn.
Quick website set up using blogdown
My aim here is not to give you a comprehensive introduction to blogdown but just so you can get started. For a detailed introduction, I would refer you to the blogdown book. If you find some issues, the author, Yihui Xie, prefers you write the problem on stack overflow with the tag blogdown instead of submitting it to github issues.
First install the blogdown package if you haven’t got it:
install.packages("blogdown") Next go to the directory that you plan to create a folder with all the files related to your website by using setwd(path/to/your/directory) or otherwise. Then run the following command to create a new site in folder yoursite using the Hugo Introduction theme by Vicki Lai.
blogdown::new_site(dir="yoursite", install_hugo=TRUE, theme="hivickylai/hugo-theme-introduction")You can do the same using the File > New Project > New Directory > Website using blogdown.
You can easily change the theme BUT first delete the folder that was created.
The list of hugo theme can be found here. To use the hugo themes that are hosted in github, you need to know the github username and repository and replace theme=username/repository in the argument. The github page can be usually found from selecting one of the theme here > Homepage. The username and repositary can be found in the url in the form of https://github.com/username/respository.
After you have chosen the theme that you want, the first thing is to open the file config.toml. Usually it’s pretty straight forward here. Replace the values in the config.toml to your details. After you have done that run the command
blogdown::serve_site()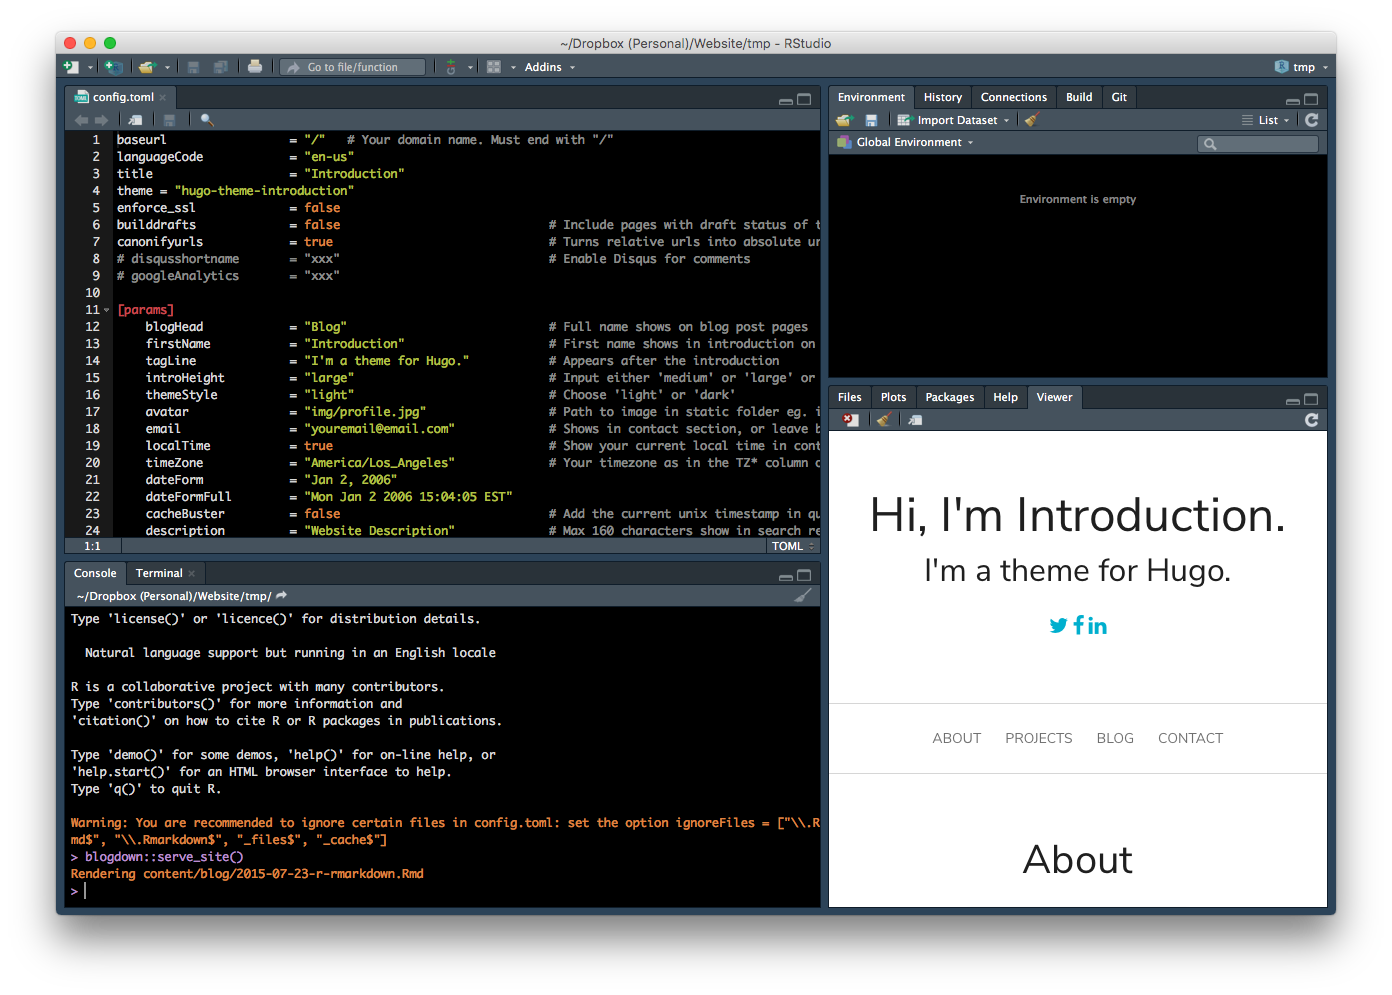 You should find the site is now rendered on the Viewer pane in RStudio.
Getting an error running the above command? You may be able to fix this by updating blogdown to the latest version. blogdown has dependencies so you those may need to update those too so try running the following if it’s still not working for you:
update.packages(ask=FALSE)If you are still having an issue then try googling it first. If you really have trouble resolving it then post the error message in stack overflow with the blogdown tag. If you can, put a minimum replicable example with your post.
Why blogdown instead of hugo alone?
You may have been able to tell but the website is in fact created by hugo and blogdown acts as a wrapper in R for hugo. So what’s the point of blogdown? Why not just work with hugo alone?
What makes blogdown amazing is its ability for a seamless workflow of creating a website with sections rendered by R markdown.
This is probably explained best by an example. Let’s say we make our first post.
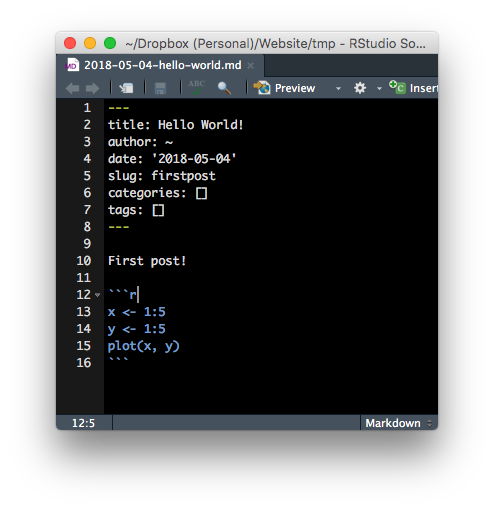
blogdown::new_post(title="Hello World!", slug="firstpost", subdir="blog")This should make a new markdown document that will load in RStudio. Here is a glimpse of what I wrote in that markdown:
 Now if you run
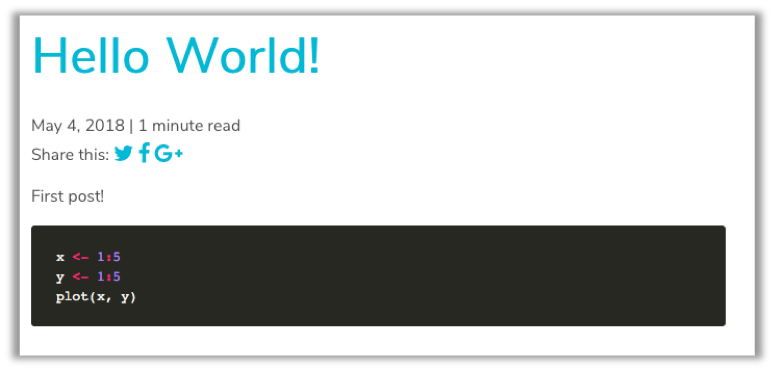
 blogdown::serve_site() (or if you still have it running from before, it may automatically update as you change it), you should be able to see your post. The address of the post should be something like your.base.url/blog/firstpost. You will then see something like below image
 So the above just shows the R commands but did not evaluate those commands. Let’s redo this with R markdown. You can do this by adding by the argument
 ext=".Rmd" as below.
blogdown::new_post(title="Hello World!", slug="firstpost", subdir="blog", ext=".Rmd") Since it is a R markdown, you need R to execute the R commands. So now running
 blogdown::serve_site(), we have:
 and you can see that the plot has rendered!
This whole process streamlined makes posts with R commands easier and also makes it easily reproducible!
For comparison, I used to have to run R markdown separately, copy the generated html content in the appropriate place in my website. It was not a simple copy and paste too as websites usually come with its own preambles and footer. If there were images that were rendered then I have to move the figures in the corresponding place for the images to render in the webpage. Needless to say, the whole process was cumbersome. And before R markdown, it was even more work. I can’t emphasise enough how great blogdown has made it for blogging!
I've decided to close down my old blogger site and move on with website built by @xieyihui's blogdown package. It makes it so much easier to blog!!! Here's hoping I'll blog more this year. Here's the new site: https://t.co/nwqcvqjdMu
— Emi Tanaka 🌾 (@statsgen) January 20, 2018
How do you deploy your website?
The easiest option is use netlify. I set up my one via github pages. You can find more details here.
Code syntax highlighting
Some hugo websites come with built-in syntax highlighting.
Be aware that the Viewer pane in RStudio sometimes does not show the syntax highlighting but it will show in the website if you open it up via other browser. This took me a while to realise.
For a more detailed description about syntax highlighting, check out Amber Thomas’ blog post.
Using hugo short code in R markdown
Some hugo themes will come with its own hugo shortcodes. These can be quite handy but if you are using R markdown, it doesn’t work as it does in markdown. E.g. I can embed a tweet by using
{{< tweet 989847683295686656 >}}in the markdown but to make it work in R markdown, you need to use
htmltools::HTML("{{< tweet 989847683295686656 >}}")Blinging up your website with html tricks
These tricks are more likely to break your website so be sure to back it up before attempting them. It is better to attempt these higher level customisation once you can deploy your website with the standard customisation that comes with the hugo theme.
Once you realise the structure of how hugo generates the website then you can start to see how to embed some custom html codes to bling up your website. For example, here is a glowing twitter icon:
To place this in your website, go first to this website then on the footer and click on the Export then Export.zip. Unzip this file.
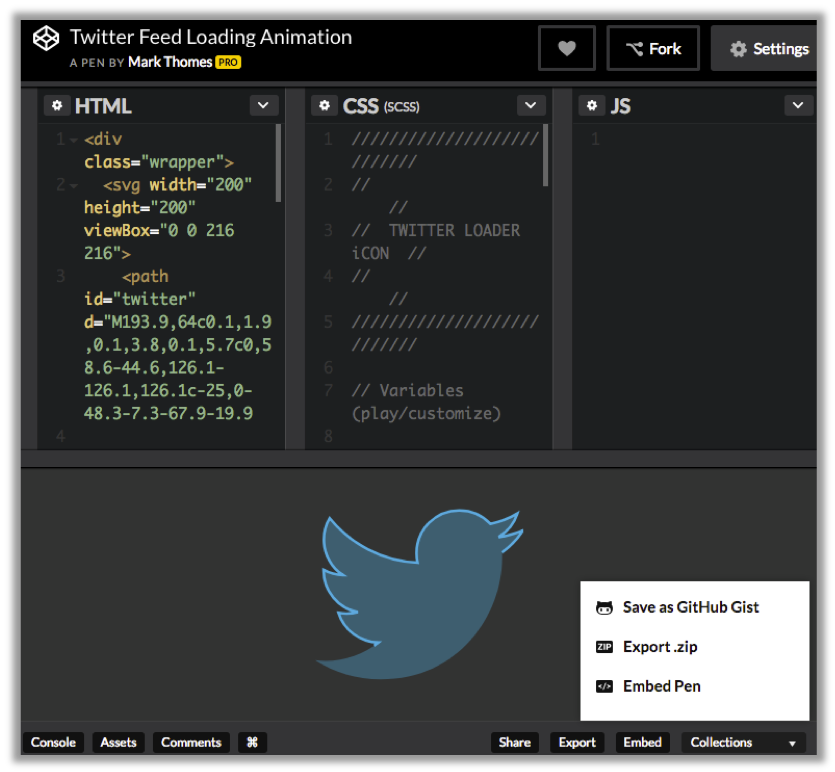 This parcticular so-called pen comprises of html and css. Copy the
 css folder from the pen folder into the static folder in your website folder.
Next open the index.html from the pen folder using RStudio (or a text editor of your choice). For this part, you need to have a read through of the code to find the relevant part. You cannot simply copy and paste all the content of index.html since your website will have it’s own header, body structure and footer. Scanning index.html, the relevant code for the pen is contained here
  <div class="wrapper">
  <svg width="200" height="200" viewBox="0 0 216 216">
    <path id="twitter" d="M193.9,64c0.1,1.9,0.1,3.8,0.1,5.7c0,58.6-44.6,126.1-126.1,126.1c-25,0-48.3-7.3-67.9-19.9
      c3.5,0.4,7,0.6,10.6,0.6c20.8,0,39.9-7.1,55-19c-19.4-0.4-35.8-13.2-41.4-30.8c2.7,0.5,5.5,0.8,8.3,0.8c4,0,8-0.5,11.7-1.6
      C24,121.9,8.7,104,8.7,82.5c0-0.2,0-0.4,0-0.6c6,3.3,12.8,5.3,20.1,5.5C16.9,79.6,9,66,9,50.6c0-8.1,2.2-15.7,6-22.3
      c21.9,26.8,54.5,44.5,91.3,46.3c-0.8-3.2-1.1-6.6-1.1-10.1c0-24.5,19.8-44.3,44.3-44.3c12.7,0,24.3,5.4,32.3,14
      c10.1-2,19.6-5.7,28.1-10.8c-3.3,10.3-10.3,19-19.5,24.5c9-1.1,17.5-3.5,25.5-7C210.1,49.9,202.5,57.7,193.9,64z"

      stroke-dasharray="1100 1100"
    />
  </svg>
</div>
This code only draw the outline of the twitter icon. The glow and outline animation are coded within the css files. You need to link to those files that you copied to the static folder before within the post and this can be done by placing below in your post.
<link rel="stylesheet" href="/css/style.css">
<link rel="stylesheet" href="/css/7534eb3fb62294822de9eace9.css">
You can search other pens at codepen. It’s a bit tricky to get it right and more than often I break my website or it overwrites the css where I don’t want it to.
You probably want to think the purpose of whatever code you want to insert on your website. Having too much bling can make the website “heavy” and may distract away from the content of your website. It’s also an investment of your time to implement right and it just might not be worth it. Nonetheless, it’s a chance to do a higher level customisation. I tweaked the Academic theme to get those effects on my main website. I recently came across Earo Wang’s webpage and I can see she tweaked the Academic theme too. She’s using tufte-like format and it looks fantastic! I updated my footer after seeing hers. Anyhow proceed with some caution but have fun blinging up your website!
Making a showcase website
What is a showcase website?
I designed my showcase website specifically to graphically showcase my results from my selected work and collboarations. It’s a concept more popular with artists but I thought why not with statistics or data science? It’s a great way to communicate what your skills are and from the popularity of my tweet, the idea seems to have resonated well with the community.
I made a graphical showcase of my selected work and collaborations using #blogdown by @xieyihui. I want to see yours #rstats https://t.co/k6ClP7QjJm pic.twitter.com/Dl5SJYK3y5
— Emi Tanaka 🌾 (@statsgen) April 29, 2018
My showcase website got Hadley Wickham’s endorsement as a fantastic way to show off a portfolio of your work when you are looking for a data science job.
This is a fantastic way to show off a portfolio of your work when you are looking for a data science job https://t.co/sFt8hcChMv
— Hadley Wickham (@hadleywickham) April 29, 2018
I would love to see more of these showcase websites. If you make one, I would love to see it. You may like to use the hashtag
to share your showcase website so everyone can easily see your website, get inspired, you can get a feedback on it or you may even get a job offer from it. You learn a lot from others’ creative works. I find that I’m constantly inspired by others - particularly from Sarah Romanes! (Sarah’s got style! She’s to watch out for!).
@sarah_romanes inspires me once again. Thanks for the great talk! https://t.co/sIu83rVxOq
— Emi Tanaka 🌾 (@statsgen) April 27, 2018
I got inspired by @sarah_romanes to make my own hex sticker for my R package https://t.co/a34FSlNjvh pic.twitter.com/tURHY4scR8
— Emi Tanaka 🌾 (@statsgen) April 1, 2018
You can see my showcase website here. This was made by using the Forty theme. I did very little customisation for this theme so it will be easy for you to implement it as well. So give it a try and I hope I get to see your showcase!